Hey there! This site is reader-supported and we earn commissions if you purchase products from retailers after clicking on a link from our site.
So you want to make beer at home but have found out that there are some hurdles. Most guides talk about making 5- to 10-gallon batches of beer, buying expensive equipment like fermenter vessels and carboys, and needing hundreds of bottles for the final result. Guess what? You don’t have to do all that, not with small batch brewing.
When we say small batch, we mean any batch of beer that is less than 5 gallons. In other words, you could produce a single 6-pack of beer or experiment around with a small batch recipe and have far less prep, clean up, and struggles.
If that sounds like something you’re interested in, then this ultimate guide to small batch brewing is for you.
How is Small Batch Different From Regular Homebrewing?
There is no real difference in the methods of small batch brewing, except for the part where you brew less. You can still choose between malt extracts or all-grain brewing, as the process and techniques don’t change much. You can also scale down any recipes that you know of and get excellent results.
The only perceptible difference is the ease and flexibility. Brewing a small batch can be done in the tiniest of spaces, making it ideal for those with space or mobility issues.
Advantages of Small Batch Brewing
Many brewers have a question: Is it worth it to brew 5 gallons of an experimental recipe? Let’s face it. Brewing 5 gallons is a lot. You have to invest time, effort, and money into the process, and the beer might not end up as you had expected. This is especially true for those who are just beginning their homebrewing hobby.
That’s why small batch brewing can be advantageous.
Low Start-Up Cost
Homebrewing can be an investment. Some pieces of equipment are worth hundreds. Small batch equipment is not as costly, and you can even use most of it when you decide to start making 5 or 10 gallon batches.
Space
This is probably the one advantage that most homebrewers will agree upon. With small batch brewing, you don’t need to invest in a lot of equipment, and you don’t have to worry about needing tons of space. A five gallon system won’t fit on a shelf, but micro batch equipment will. That means you get a lot more flexibility with where you can brew your beer. Finally, homebrewers trapped in smaller apartments can now make beer right on their stove top.
Convenient
Since setting up, cleaning, and bottling is easier when you have smaller items and less beer, small batch brewing saves you time. If you have put brewing at home on pause because it’s time consuming, consider brewing less beer.
Experiment
Committing to a full batch when you want to experiment can be off-putting. Test out new ideas, recipes, and techniques with smaller batches to limit the risk. As for you experienced homebrewers out there, you will find that you can harvest yeast from those smaller batches. Instead of making a yeast starter, make a gallon of drinkable beer.
Small Batch Brewing Supplies
Brewing beer is all about having the right equipment available and some patience. Since gaining patience can be a lifetime long effort, just make sure you have the proper items to streamline the small batch brewing process:
- Equipment sanitizer
- Food-grade bucket to sanitize everything else
- 15-quart (14.2L) kettle or larger
- 24-inch (60.9 cm) filter bag for mashing
- Digital thermometer
- Gloves
- Mash stirrer or slotted spoon
- Digital kitchen scale
- 2-gallon (7.57 L) primary fermentation bucket
- 1-gallon (3.78 L) glass carboy with a rubber stopper and small hole for secondary fermentation
- 3-piece airlock
- Mini auto-siphon
- Hydrometer
- Bottle filler
- Vinyl tubing, food grade
- 12-ounce (354 mL) beer bottles
- Unpressed bottle caps
- Bottle capper
Small Batch Homebrew Pale Ale Recipe
The best beer doesn’t come from the equipment you buy—not entirely. Great tasting beer is the result of the quality of ingredients used alongside time and diligence. Here is a wonderful (and simple) recipe that you can use to try out small batch brewing or to get started on your homebrewing adventure. It’s a single malt, one hop pale ale that will go great with any kind of food.
Gather the following:
- Choose between 2 pounds (0.9 kg) of crushed pale malt or 1.5 pounds (0.68 kg) of liquid pale malt extract or 1.2 pounds (0.5 kg) of light dry malt extract
- 1 packet of Safale US-O5 Brewer’s yeast
- 1 ounce (28.25 g) of Cascade hop pellets
- Water – tap or filtered
Allow us to also make a small caveat: use clean filtered water. A novice homebrewing mistake is using poor quality water. Since water makes up nearly 90% of beer, you want the main ingredient to taste good, right? Though tap water is fine in most cases, you can enhance the quality of your home brew by grabbing some filtered spring water from the grocer.
Don’t use distilled water, either. It might seem smart to use a water that has zero contaminants in it, but distilled water is also stripped of vital minerals that assist with fermentation.
The Small Batch Brewing Process
Now that you have your ingredients and small batch brewing equipment gathered up, it’s time to learn what to do with those things. The first step whenever you homebrew should be to clean and sanitize everything the beer could potentially touch during the whole process. We’ll get to that in a moment. Right now, figure out if you plan on mashing your grains or using an extract. If you’re using a brew kit or extracts, skip the step labeled “Mashing Your Grain.”
Sanitize and Clean Your Equipment and Workspace
Experienced homebrewers know that cleaning and sanitizing is never done and should never be overlooked. You want your brewing station and gear to be free of any contaminants, such as bacteria. Dirt, grime, and bacteria can alter the flavor of the beer, making it undrinkable. No one wants to have wasted weeks of brewing labor to end up with vile beer.
Make sure your kettle has been washed out and sanitized prior to prepping your grains. You can get the wort boiling before sanitizing the rest of your equipment. Grab your bucket and fill it with water. Follow the instructions on the package of your brewing sanitizer to make sure you are adding the correct amount.
Soak everything that will touch the beer for at least 5 minutes. These items include:
- 3-piece airlock
- Mini auto siphon
- Vinyl tubing
- Primary fermentation bucket and lid
One more thing: Don’t forget to wash your hands regularly.
Mashing Your Grain
There are a couple ways to make a mash, such as all grain brewing or brew-in-a-bag (BIAB). We want to make this a relatively easy process, though, so for this particular instance, we will be describing the steps using the brew-in-a-bag method. If you’re experienced in all grain brewing and prefer that method, feel free to go that route instead.
Step 1: Prepare The Mash
Take your kettle and fill it with about 6.6 Liters (7 quarts) of water. Heat to 170°F (76.6°C). You won’t need to add anymore water after this. By the time you are done, those 7 quarts will have boiled down to a gallon (3.78 L).
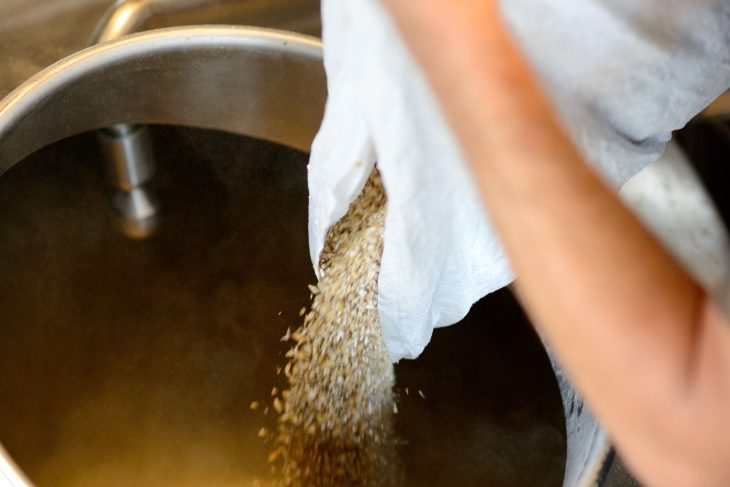
Take your mesh brew bag and put it in the water. Gradually put the crushed pale malt into the bag while you stir the water with your slotted spoon. Stirring gently and adding the malt slowly prevents any wads of malt from sticking together.
Step 2: Rest The Mash
After you have added your mash, put a lid over the kettle, turn off the heat, and let the pot sit for an hour. During this time, the temperature should remain around 150°F (65.5°C). If you’re worried about the temperature falling too far, you can wrap the kettle in a blanket for more insulation.
The mash needs an hour to rest to ensure the malt starches are converted into sugar that is released into the liquid. This is how you get something called “wort.”
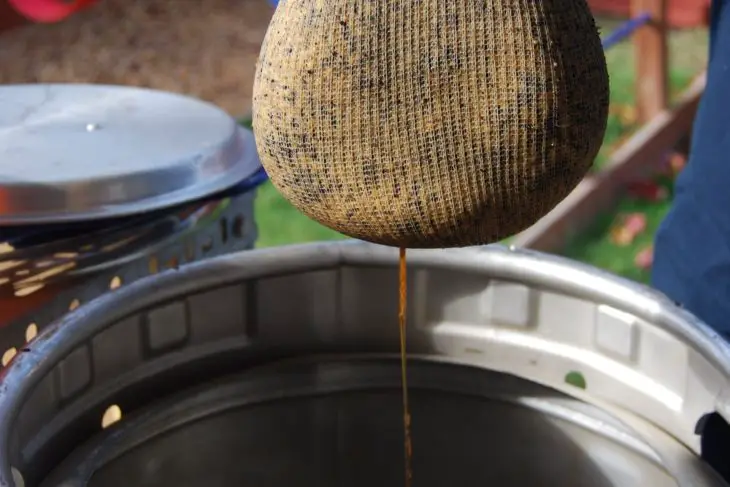
Step 3: Wort Extraction
Put on your brewer’s gloves to keep your hands safe for this step. You have to pull the bag from the wort then give the bag a loving squeeze to ensure all that malty goodness has made it into the wort. Use the leftover grains as compost.
Micro Batch Brewing With Malt Extract
Brewing in a bag not your thing? Extract brewing speeds things up while still producing an amazingly scrumptious beer. If you want to know the ins and outs of extract brewing, check out our Extract Brewing Guide for Beginners.
Small batch brewing with extracts begins just like the BIAB method. You need to use your kettle to heat 7 quarts (6.6 L) of water. Before the water boils, add the malt extract of your choosing and stir until it has completely dissolved.
You never want to add malt right as the water boils, because you will make the water boil over. The result is a sticky eruption that will cover the entire workplace. It’s no fun and not recommended.
Congratulations, you now have wort.
Boil Your Wort and Add The Hops
From here on out, whether you used extracts or made your own mash, follow the same steps.
Remove the lid from the kettle. Bring the wort back to a boil, keeping a close eye on it along the way. Wort likes to boil over when you’re not looking. As soon as the wort starts to bubble up or rise, remove the kettle from the heat until the liquid returns to normal. Boil the wort for approximately 1 hour.
For the pale ale recipe we mentioned above, you will need to add your hops at three different moments during the 60-minute boil. Divide your Cascade hops into three even piles of 9.5 g (0.33 oz) each.
At the beginning of the boil, right when the wort comes to a boil, you will want to add in the first bit of hops. These hops remain in the wort during the full hour and work to balance out the sweetness of the malt with their intrinsic bitterness.
When there is 30 minutes remaining to your boil, add the second portion of hops. This adds another burst of flavor.
And when there is only 15 minutes left, you add the final bit of hops for a refreshing hop aroma and crispness.
Hop varieties will change how your beer comes out, so later on, you should expert with different beer recipes and the hundreds of hops that exist.
Cooling Your Hopped Up Wort
The hour is up and it’s time to move onto the next portion of the small batch brewing process. You will need to cool the wort swiftly. Do this by either submerging the kettle in an ice bath with the kettle lid on.
Making the ice bath is easy. Plug up the kitchen sink, fill the basin with cold water, and add ice. If your freezer doesn’t have a lot of ice stored up, you can purchase a bag of ice from the store.
Cooling can also be accelerated by moving the kettle around in the ice bath slowly. Keep watch on the temperature with your digital thermometer. Keep the wort in the ice bath until it reaches 70°F (21.1°C).
Want to make life a little easier? A wort chiller might be a wonderful investment.
Aerating the Wort, Pitching the Yeast
Remember all that sanitation you did at the beginning? Now it comes in handy. You are going to need the mini auto siphon and the vinyl tubing to transfer your wort into the primary fermentation bucket. Siphon carefully to avoid the boiled hops that are lingering at the bottom of the kettle. You don’t want these sucked up into the fermentation vessel.
Once the wort is transferred to the fermenter, you need to aerate it. Snap the fermenter’s lid in place, seal the hole on the lid with some sanitized aluminum foil, and shake the bucket. Why do you shake it like you’re making a cocktail? For oxygen. The yeast will be pleased with your oxygen offering and will reward you with alcohol.
Yes, seriously.
So shake that wort for about 5 minutes. When you finish, grab the yeast and pitch it—add it to the wort. You only need about ¼ of the package that the yeast comes in. And no, you don’t need to measure out an approximate amount. An eyeballed estimate works fine. Just don’t add the whole packet.
Small Batch Primary Fermentation
The wort has been aerated and the yeast pitched. Now what?
Pick up the airlock and put it on the fermentation chamber. Once the airlock is installed, place the fermenter somewhere dark and cool for 7 days.
It’s a bit of a waiting game, but you will be able to see changes in your beer from the beginning. Within 12 hours, bubbles should form on the airlock. A good sign. It means that the yeast is eating up the sugar in the wort, producing CO2 and alcohol.
Secondary Fermentation
You were good and waited a whole week for primary fermentation. About this time, you have in-progress beer. It’s not yet drinkable but no longer a sludgy mess of malt and hops. After the first week of fermentation, you need to transfer the beer to the secondary fermenter—a sanitized glass carboy.
At the bottom of the primary fermenter should be a layer of trub—or particles and yeast that have settled. Try to keep trub from getting into the second fermentation chamber, as that helps produce a clear beer. The other reason for secondary fermentation is to slow the process and allow for the beer’s flavors and aromas to develop more completely.
Sanitize the rubber airlock, install it on the carboy, and then place the WIP beer in that same dark place.
Bottling Your Small Batch For Carbonation
14 long days have passed since you started fermenting your beer, and you’re probably chomping at the bit to sample some of it. Good news, you’re almost there! Well, kind of. You need to carbonate your beer first.
Bottle your beer and add a bit of priming sugar to each bottle before capping them off. Any remaining yeast will feast on the sugar and release carbon dioxide. The easiest way to prime your beer is to use priming sugar tablets. These are pre-portioned, so you don’t have to use a calculator to figure out how much is needed and risk “beer bombs,” or exploding bottles that had too much carbonation.
How do I bottle beer, you ask? Say hello to your dear old friend, the sanitizer solution. You will also need the same food-grade vinyl tubing, beer bottles, beer caps, a filler wand, and the mini auto-siphon. Once again, wash, soak, and sanitize everything.
Attach the tubing to the auto-siphon and to the bottle filler. Place the siphon in the beer and turn it on. The bottle filler will stop the beer from flowing automatically. Line up the beer bottles on a baking sheet to catch any spilled beer. Put the priming sugar tablets in the bottles, following the instructions on the packaging. You will most likely need 3-5 tablets per bottle, depending on the brand and the size of the bottle.
Once that is done, put the filler wand into a bottle and press down. The beer will start filling the bottle. As the liquid reaches the neck, lift up the wand to cease filling. Put on a beer cap to keep contaminants out. Repeat until all bottles are done.
Use a bottle capper to seal the bottles tightly closed. Store the bottles somewhere dark and cool. Then, you wait another 2 weeks—we know how painful that sounds—for conditioning to complete.
What Happens If My First Small Batch is Over-Carbonated?
Newer brewers experience hang-ups, and it’s no big deal if something like this does happen. Usually, over-carbonation is caused by one of two things:
1. Unstable final gravity: When you jump the gun and bottle your beer too early, you get too much carbonation. You want to ensure that the final gravity (FG) of your beer has stabilized before bottling it. Use a hydrometer to get an FG reading. When it doesn’t change for 3 days, you are good to go.
2. Priming sugar overload: If you are using a brewing kit, it probably came with a bag of priming sugar. That sugar is meant to carbonate a certain volume. Use a priming sugar calculator to ensure you are using the proper amount of sugar. Remember, you often end up with less beer than originally planned. Also, you shouldn’t prime bottles with honey. It’s commonly found in small batch kits, but honey can be inconsistent. Always use table sugar (sucrose).
Taste, Enjoy, or Store
It’s taken nearly a month for your batch of beer to finish up, and now you are ready to give it a try. Cool the beer in the fridge for a few hours before taste testing it.
Hopefully, it turned out delicious and goes down easy. If not, you only have a six pack, so it’s not a total waste. Write down what you liked and disliked about the end result then fine tune the process for your next small batch. And if you loved it, aim for a full 5 gallon batch next time!
Brewing Your First Batch Of Homebrew – Video Guide
Here’s a great video on brewing your first gallon of homebrew by Glen And Friends Cooking
Final Thoughts on Small Batch Homebrewing
Whether you are trying out homebrewing for the first time or simply want to make a smaller amount of beer for an experiment, micro batch brewing is an excellent method to use. For craft beer connoisseurs, small batch brewing is also intriguing, fun, and may give you new ideas for a delicious beer.
Why not try out small batch brewing on your free time? You’ll find it to be a relaxing, less time consuming way to whip up beer.
Recommended Reading
Brewing Recipe for Pilsner Beer
Pilsners have a reputation for being one of the hardest beers to brew. That's why the general pilsner recipe is labeled for intermediate homebrewers.
How to Malt Barley: 18 Easy Steps To Malt Barley At Home
Barley is often seen as the very essence of beer, so knowing how to malt barley is important. If you are a home brewer who is eager to learn how to take on this task right from the comfort of your own home, you’re in luck.
How to Batch Sparge For Maximum Brewing Efficiency
You started out with brewing beer from extracts. Then you tried all grain brewing and brewing in a bag. What’s next on the challenge list? Batch sparge brewing may become your new favorite process once you give it a try.
Non-Alcoholic Mead Recipes & Mead-Flavored Alternatives Without Alcohol
For thousands of years, people have succumbed to the alcoholic effects of mead. Fortunately, we live in an era with technologies that make booze a little less, uh, boozy.
Decoction Mash: Your Pro Guide
Decoction mash is an ancient and often misunderstood technique that can take your beers to the next level. Learn more about this process!
How to Get Started with Brew in a Bag
The brew in a bag method is a lot like using a tea bag to brew a cup of tea. You essentially steep the grains in water to get beer.
