
You’ve nailed your recipe and finished the boil, but now there’s a kettle of hot wort sitting there, and every minute it stays warm gives bacteria a chance to take hold. That’s why your wort chiller matters. The plate chiller vs immersion chiller debate trips up plenty of homebrewers, and the wrong pick can mean slow chilling, clogged gear, wasted water, or a cleaning routine you’ll dread.
Below, we’ll break down how each one works, compare cooling speed, cleaning, clogging, and water use, and help you figure out which chiller fits your setup best.
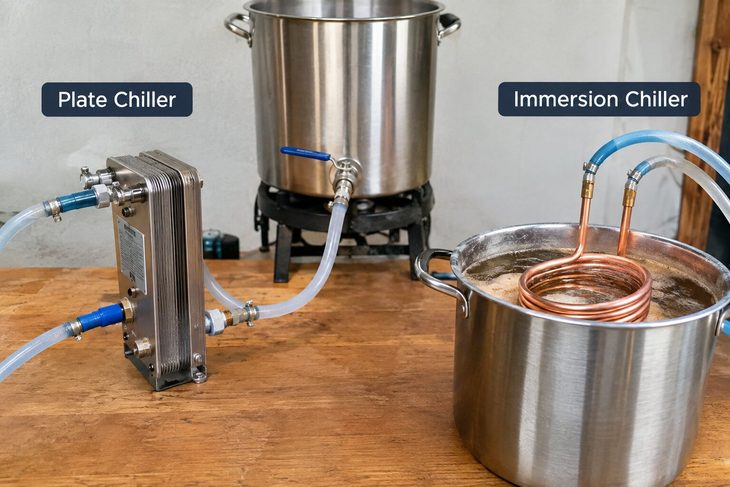
Plate Chiller vs Immersion Chiller: What’s the Difference?
Every wort chiller has one job: bring your wort from a rolling boil down to a temperature your yeast can handle, and do it fast. Quick cooling shortens the window for bacteria and produces a better cold break, which leads to clearer beer.
When brewers weigh a plate vs immersion chiller, they’re choosing between two ways of moving heat. Both rely on heat transfer through a thin metal wall, but they work differently.
An immersion chiller goes inside your brew kettle, where cold water runs through a submerged coil, and the whole batch cools together. A plate chiller is a compact heat exchanger that sits outside the kettle. Wort flows through its internal channels and comes out cooled, heading straight to the fermenter.
Whether you pick a plate chiller or immersion chiller, that difference shapes the rest of your setup:
Immersion chiller:
- Drops directly into the brew kettle
- Needs one hose for cold water in and one for warm water out
- Works with any kettle, no valve required
- No pump needed
Plate chiller:
- Connects to the kettle’s ball valve or outlet
- Needs separate lines for wort and cooling water
- Moves wort by gravity or with a wort pump
- Requires fittings like camlocks or quick disconnects
Before settling the immersion chiller vs plate chiller debate, it helps to understand how each homebrew chiller works.
Related: The No-Chill Brewing Method: A Simple Guide to Better Homebrews
How an Immersion Chiller Works
The Coil in the Pot
An immersion wort chiller is a coil of metal tubing, typically 25 to 50 feet long, shaped to fit inside your brew kettle. Most are made from copper or stainless steel.
A copper immersion chiller cools faster because copper conducts heat more than 20 times better than stainless steel. It’s also cheaper per foot. On the flip side, copper tarnishes and can react with strong acidic cleaners. Stainless steel resists corrosion and cleans up easily, but you’ll need more tubing, or a bit more time, to match copper’s performance. For most 5-gallon batches, 25 feet of 3/8-inch copper does the job, while 10-gallon brewers usually step up to 50 feet or 1/2-inch tubing.
Following the Heat
Cold water enters the top of the coil through a hose connected to your faucet, flows down through the tubing, and exits into a drain or bucket. As it travels, heat moves from the wort, through the metal walls, and into the water, which carries it away.
Place the chiller in the kettle for the last 10 to 15 minutes of the boil. The boiling wort sanitizes it, so you won’t need to handle sanitizer mid-brew. Attach and test your hoses before brew day, since tap water leaking into your kettle is a contamination risk.
Why Stirring Makes Such a Difference
Without movement, the wort touching the coil cools first and forms a layer of cooler liquid around the tubing. That layer slows heat transfer from the hotter wort farther away. Gently stirring with a sanitized spoon, or raising and lowering the chiller every few minutes, keeps hot wort in contact with the coil and can cut chilling time significantly. Brewers with a pump can whirlpool the wort for the same effect, and multi-coil designs like JaDeD Brewing’s Hydra add surface area for faster kettle chilling.
How a Plate Chiller Works
Stacked Plates, Serious Surface Area
A plate wort chiller is a sealed block of thin stainless steel plates, usually brazed together with copper. The gaps between plates form narrow channels. Alternating channels carry wort, and the ones in between carry cooling water.
Because both sides of each plate transfer heat, a chiller small enough to hold in one hand can contain several square feet of heat-transfer surface. The plates are stamped with a corrugated pattern that creates turbulence as liquid flows through, which keeps heat exchange efficient. Plate count matters: more plates mean more surface area and faster chilling, but also more resistance to flow. Blichmann’s Therminator is a well-known homebrew model, and many brewers use generic brazed plate heat exchangers built for industrial use.
The Counterflow Advantage
A plate chiller runs as a counterflow heat exchanger. Hot wort enters one end while cold water enters the opposite end, so the two streams move in opposite directions. As the wort travels through, it keeps meeting colder water right up until it exits. That lets the outgoing wort reach a temperature close to your incoming cooling water in a single pass.
Keeping Wort and Water Apart
The plates physically separate the wort and water, so the two never mix. Only heat passes between them.
To move wort through the chiller, you’ll use either gravity, with the kettle raised above the fermenter, or a wort pump. A pump makes it easier to control wort flow, which is how you fine-tune the output temperature. Clip a thermometer onto the outlet line so you can see results in real time. Start the cooling water before the wort, so the first wort out isn’t still hot. Plate chillers typically have threaded ports, so plan your fittings before brew day.
Cooling Speed
Before naming the fastest wort chiller, it helps to know what actually controls chilling time. The same chiller can perform very differently depending on the season, your water supply, and how much wort you’re cooling. A plate chiller that hits pitching temperature in minutes during winter may struggle in summer, when groundwater in warmer states can come out of the tap at 75°F or higher.
Plate chillers generally win on raw speed because they cool wort in a single pass on its way to the fermenter. Immersion chillers cool the whole batch at once, which takes longer but means no wort sits hot while waiting its turn. With a plate chiller, the wort still in the kettle stays hot during draining, so hops continue adding bitterness. For hop-forward beers, some brewers adjust late hop additions to compensate.
Here’s what to know about cooling speed:
- Water temperature: The single biggest factor for both chillers. Colder water means faster chilling.
- Flow rate: With a plate chiller, slowing the wort flow or increasing the water flow lowers the outlet temperature.
- Batch size: Larger batches widen the speed gap in favor of plate chillers.
- Plate chiller cooling time: A 5-gallon batch often reaches pitching temperature in under 10 minutes with cold water and a tuned flow.
- Immersion chiller cooling time: Expect around 15 to 30 minutes for 5 gallons with cold tap water and regular stirring, and noticeably longer without stirring.
- Stirring: Moving the wort, or the chiller, is the easiest way to speed up an immersion chiller.
Cleaning and Sanitizing
To clean an immersion chiller, rinse it with hot water right after brewing, wipe off any residue, and hang it to dry. Every surface that touches wort is visible, so you’ll know when it’s clean. If copper turns dull, a short soak in diluted vinegar restores the shine, followed by a thorough rinse. Sanitizing is handled by placing the chiller in the boil for the last 10 to 15 minutes.
A plate chiller takes more work because its internal passages are narrow and can’t be inspected. Proteins and hop particles can hide inside. PBW, a cleaner made by Five Star Chemicals, is a go-to choice for brewing sanitation because it breaks down organic residue without scrubbing. Here’s how to clean a plate chiller and sanitize it for the next brew:
- As soon as the last of the wort drains, disconnect the chiller from the kettle and fermenter.
- Backflush the wort side with hot water, running it in through the wort outlet and out the wort inlet, the reverse of normal flow.
- Continue backflushing until the water runs clear with no visible hop or trub particles.
- Flush once more in the normal flow direction to catch anything that shifted.
- Mix a hot PBW cleaning solution according to the label directions.
- Recirculate the PBW through the wort side with a pump for 15 to 30 minutes. Without a pump, fill the chiller with solution, cap the ports, and let it soak.
- Drain the PBW and rinse thoroughly with hot water until there’s no slick feel to the rinse water.
- Every few batches, run an acid rinse to remove mineral scale and beerstone, then rinse again with water.
- Drain the chiller completely and let it dry, using compressed air to clear the channels if you have it. Some brewers bake their chillers in the oven to dry and sanitize them, but check your manufacturer’s guidance first.
- Cap the ports or store the chiller in a clean, sealed bag to keep dust and insects out.
- Before your next brew, recirculate a no-rinse sanitizer like Star San through the wort side for a few minutes, or run near-boiling wort through it just before chilling to heat-sanitize.
Why You Shouldn’t Wait Until Tomorrow
Clean while everything is still wet. Wort residue is sugary, sticky, and full of proteins, and once it dries, it hardens and becomes far harder to remove. In a plate chiller, dried residue sits in places you can’t see or scrub, where it can harbor bacteria that spoil your next batch. Ten minutes of cleaning right after brewing saves hours of work later and protects the beer you haven’t brewed yet.
Risk of Clogging
Plate chiller clogging is the most common complaint about these chillers. The narrow internal channels can become restricted by hop debris, trub (the sediment of proteins and hop matter that settles after the boil), and stray grain husks. A partial clog slows chilling. A full clog stops the wort flow entirely and traps debris where cleaning solution struggles to reach.
Hop pellets cause most of the trouble. In boiling wort, pellets break down into fine particles that travel wherever the wort goes. Heavily hopped styles like hazy IPAs, which can use a pound or more of pellets, create a lot of wort sediment and raise the risk of clogs.
Immersion chillers don’t have this problem. Since wort never passes through the chiller, there’s nothing to block. Trub settles at the bottom of the kettle, and you can leave it behind when you transfer to the fermenter.
Related: Mixed Fermentation Explained: A Beginner’s Guide to Complex Fermentation
Keeping the Gunk Out
To prevent plate chiller clogs, stop debris before it reaches the chiller. Here’s how brewers do it:
- Hop spider: a mesh bag or basket that holds hops during the boil. It’s simple and effective, though an overpacked spider can slightly reduce hop utilization.
- Kettle screen or filter: a stainless mesh screen over the kettle’s pickup tube that catches larger particles.
- Whirlpooling: stir the wort vigorously in a circle, let it rest for 10 to 20 minutes, and the trub gathers into a cone in the center. Draw wort from the side of the kettle, leaving the cone behind.
Combining a whirlpool with a kettle filter is one of the most reliable ways to keep a plate chiller running smoothly.
Water Usage and Efficiency
Cooling water temperature affects both chillers more than any other factor. The colder your water, the faster heat leaves the wort and the less water you’ll use. In warm months or warm climates, groundwater may not be cold enough to reach pitching temperature on its own, no matter which chiller you use.
Plate chillers are known for efficient wort chilling. Their large heat-transfer surface pulls heat out quickly, so each gallon of cooling water absorbs a good amount of heat before it leaves. Tuning the flow rate so the water exits warm, rather than barely warmed, keeps water consumption down.
Immersion chillers tend to use more water. Early on, the water leaving the coil runs hot, which means it’s absorbing plenty of heat. As the wort cools, the outgoing water gets cooler and removes less heat per gallon. A 5-gallon batch can easily use 20 to 40 gallons of water, depending on your conditions. To reduce wort chiller water usage, run the tap at full flow while the wort is hottest, then slow it down as the temperature drops.
A two-stage setup can make either chiller more water-efficient. Use tap water to handle the initial cooling, then switch to a water reservoir filled with ice water, pumping it through the chiller in a loop to finish the job. A pre-chiller works too: place a small immersion chiller in a bucket of ice water and run your tap water through it before it reaches your main chiller.
Don’t send the warm outflow down the drain. Collect it in a bucket or reservoir and use it for cleaning, since hot water helps PBW work faster. Once it cools, you can use it to water the garden or do laundry.
Which One Should You Choose?
For beginners and occasional brewers, an immersion chiller is the easiest place to start. It’s affordable, easy to clean, and works with any brew kettle and a garden hose. There’s no pump to buy, no fittings to figure out, and no risk of clogging.
For large-batch brewers regularly making 10 gallons or more, a plate chiller starts to make more sense. It cools big batches quickly in one pass, while an immersion chiller has to work longer to cool the full volume at once.
If fast chilling is your top priority, the plate chiller is the clear choice. With cold water and a tuned flow rate, it’s the fastest wort chilling system most homebrewers can buy.
If simple cleaning matters most, stick with an immersion chiller. A quick rinse and wipe after brewing is all it needs, while a plate chiller requires backflushing, recirculating cleaner, and careful drying every time.
If your brewing setup already includes a wort pump, a recirculating mash system, or a whirlpool arm, a plate chiller fits in with little extra effort. You’ve already solved the flow problem. Some brewers even run a hybrid setup, recirculating hot wort through a plate chiller and back into the kettle to cool the whole batch evenly.
Still wondering which wort chiller you should use? Think about where your brewing is headed. If bigger batches and more advanced equipment are in your future, a plate chiller will grow with you. If you’d rather keep brew day simple, an immersion chiller will serve you well for years.
Quick Comparison
At a Glance
| Factor | Plate Chiller | Immersion Chiller |
| Cooling speed | Very fast, single-pass cooling | Moderate; faster with stirring |
| Cleaning | Needs backflushing and recirculating cleaner | Easy external rinse |
| Clogging | Prone to clogs from hops and trub | No clogging risk |
| Water usage | Efficient when flow is tuned | Uses more water, especially near the end |
| Setup complexity | More fittings; gravity or pump needed | Simple hose connections |
| Equipment compatibility | Best with pumps and advanced setups | Works with any brew kettle |
If you’re comparing an immersion vs plate wort chiller in a nutshell, the plate chiller trades convenience for speed, while the immersion chiller trades a little speed for simplicity.
Chill Out and Brew On
So, plate chiller or immersion chiller? It really comes down to how you brew. Plate chillers are the speed kings, but they need a bit more gear, a solid cleaning habit, and some care to keep hop gunk from clogging things up. Immersion chillers take a little longer, yet they’re simple, forgiving, work with any kettle, and clean up in no time. Either way, colder water and smart water use will make a bigger difference than you’d think.
If you’re new or love a laid-back brew day, an immersion chiller won’t let you down. If you’re brewing big batches or already rocking a pump, a plate chiller’s worth the extra effort. Pick your fit, chill that wort fast, and get brewing!
FAQs – Plate Chiller vs Immersion Chiller
The three main types of wort chillers are immersion, counterflow, and plate chillers. An immersion chiller sits inside the kettle, with cold water running through a submerged coil. A counterflow chiller sends wort through an inner tube while cold water flows the opposite way around it. A plate chiller pushes wort and water through alternating channels between stacked stainless steel plates.
There’s no single best chiller for every brewer. Immersion chillers are the top pick for beginners and anyone who wants a simple setup and easy cleaning. Plate chillers win on speed and shine with large batches and pump-based systems, but they need more cleaning and clog prevention. Counterflow chillers land in the middle, offering fast chilling with fewer clogging headaches than plates.