Hey there! This site is reader-supported and we earn commissions if you purchase products from retailers after clicking on a link from our site.
It takes several weeks for your beer to ferment and allow it to condition. Though these final steps are essential, let’s face it. You want to drink your beer as soon as possible. It’s why you made your homebrewed beer, after all. Unfortunately, most people know that bottling beer is a tiring process. A little unfair after that long wait, don’t you think? But here is some good news: an essential guide for bottling homebrewed beer faster than ever.
Let’s get right to it.
Table of Contents
- When You Should Bottle Beer
- Bottling Beer Supplies
- Guide to Bottling Homebrewed Beer Fast
- What’s Next For My Beer?
- Less Mess, More Beer
When You Should Bottle Beer
A little caveat before getting started: this does not actually cut any of the vital time out of your beer becoming as drinkable as possible. Your brew needs to ferment and condition, which will take several weeks.
Primary fermentation takes about 7-14 days. If you try to bottle your beer too early, the consequences could be catastrophic. You want to bottle your beer only after it has reached its final gravity, which should be defined in the recipe you followed. The final gravity, also known as the specific gravity, is the ratio of the wort’s density compared to water. To test the final gravity, grab a refractometer or hydrometer.
The video below will explain how to take readings with a hydrometer:
If you don’t have one of these useful trinkets, don’t worry. You can also visually assess if your beer’s primary fermentation is complete. For example, you will notice that any bubbles have vanished.
Does the final gravity check out? Then you are ready to bottle your beer.
Bottling Beer Supplies
But not so fast! You are going to need some equipment before jumping into this process. The more prepared you are for bottling homebrewed beer fast, the easier this whole thing will be. Gather up the following supplies:
- Brewing sanitizer
- Bottle caps
- Bottle capper
- 12 oz glass bottles (you will need 12 bottles for every gallon of beer)
- Auto-siphon
- Priming sugar tablets
- Bottling wand (also called a bottle filler)
- Food-grade vinyl tubing
Each of these items are absolutely necessary if you want to make the bottling process go smoothly.
Guide to Bottling Homebrewed Beer Fast
Fermented beer? Check. Equipment and bottles? Check. Now you are ready to learn how to bottle beer. Follow the steps below:
1. Equipment & Work Area Prep
As with anything you do when working with alcohol, you need to clean and sanitize your equipment and work area before bottling. Successfully brewing and bottling beer requires that nothing, including bacteria, gets into the beer. Inspect the equipment. If there is any visible dirt or grime, be sure to wash it first. Rinse the bottles, too, if you are reusing them from another batch.
The recommended sanitizers for all your brewing and bottling equipment is Five Star Powdered Brewery Wash or Star San Brewing Sanitizer. These are non-toxic and no-rinse, so you don’t have to waste time and resources on this step. Do not use bleach, as you will need to thoroughly rinse everything. Otherwise, you will end up with odd chlorine notes in your homebrew.
To sanitize, fill a clean bucket with water. You will need about 1 oz of sanitizer per 5 gallons of water. Submerge everything in the water, including your bottle filler, siphon, bottle caps, bottles, and whatever else you have gathered up for the process. These items should sit in the sanitizer solution for at least 1 minute.
Let the equipment air dry once you have pulled everything from the sanitizing bucket. If you see foam, don’t worry. Brewing sanitizers are formulated to not affect your beer.
De-Labeling Your Bottles
Do you want to reduce waste and reuse beer bottles that you have bought? It is not always necessary to remove the labels, but there are many reasons to get rid of old labels. First, there is a chance that those little pieces of paper can shred and get into the bottle during the cleaning and sanitizing process. The paper can also clog up the sink or the dishwasher. Second, removing those labels makes it easier to add your own.
Do note that if you are entering a homebrew competition, you are going to need to remove any original labels from the bottle and add your own.
So how do you remove those labels? Soaking and scraping are going to take ages, and you are trying to learn how to bottle homebrew beer fast. Vegetable oil, vinegar, or ammonia can help you get those labels off faster. Just be sure to do this de-labeling process before you clean and sanitize your bottles.
The Work Area
Once you have all that taken into account, remember to wipe down the work space, too. Also, make sure that wherever you plan on doing this, it has the right setup. Siphoning requires the work of gravity, meaning that the liquid has to flow downhill. You will need a counter, table, or shelf to set up the bucket or fermenter holding the beer.
Keep in mind that you make a mess, no matter how careful you go about this. It is highly recommended that you put down something to catch any spilled beer, such as a cookie tray or tarp.
2. Priming Sugar Time
This is the step that truly accelerates the beer bottling process. Priming sugar tablets, also known as conditioning tablets, take the guesswork out of the amount you need per bottle. Priming sugar tablets look like pellets. You can add them right to the bottle after it has air-dried, giving the yeast in the beer plenty of food to condition the beer.
Since the tablets also portion out the sugar, you know that each bottle is getting the same amount. You don’t have to worry about one bottle having zero carbonation while another explodes. Simply drop the tablets into the beer bottles.
3. Why We Skip The Rack
The traditional beer bottling process calls for racking the beer. The reason is that the priming solution could oxidize if you do not rack it. Furthermore, racking lets the beer separate from any sediment at the bottom of the fermenting vessel.
But that is an arduous and messy step. The good news is that racking your beer is totally optional.
Since you are using conditioning tablets, racking your beer is unnecessary. You do not need to mix your priming solution. Additionally, the vinyl line between the bottle filler and auto-siphon contains filters that will remove any sediment traveling down the tube.
4. Bottle By Bottle
You have already shaved off a decent amount of time by skipping measuring out priming sugar and trying to pour the same amount into each bottle. You also skipped racking. Now, you can cut down on the process of filling each bottle, too.
Connect the auto-siphon to the bottle wand via vinyl tubing. Put the auto-siphon into the beer. The pump will begin to draw the beer into the tube.
Filling each beer bottle is simple from here. Simply put the end of the bottle filler into the bottle then press the tip, opening a spring-loaded valve. The beer will flow out readily. Be sure to stop the beer before it reaches the top of the bottle. It is best to leave some space (about 1 inch) in the bottle for your beer.
That priming sugar is going to create carbonation; it will need some airspace in the bottle. You do not have to worry about exploding bottles in most cases. However, it could still happen if you don’t give the carbonation room.
Worried about handling an auto-siphon? Here is a video to show you how to set it up and use the auto-siphon:
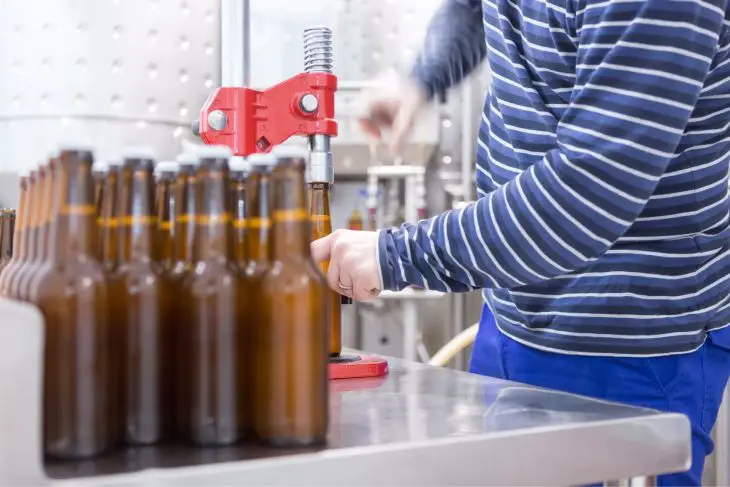
5. Cap, Store, and Condition
Now that there is beer in the bottles, you need to cap them. Each cap should already be sanitized and ready to go. You will need a bottle capper to properly seal the cap around the bottle’s mouth. Bottle cappers are relatively easy to use. Press down on the handles with both handles. You will hear a sound telling you that the bottle is now capped. Remove the capper then set up the next bottle to be sealed.
Put your bottles into 6-pack cartons or holders. Then take those bottles somewhere dark and cool.
Again, using priming sugar tablets limits the risk of explosions, but there is always a chance. Because of that, put the bottles on top of a tarp or somewhere that will be easy to clean up if an explosion does happen.
What’s Next For My Beer?
Now that your beers are conditioning for 14-28 days, depending on the style and the flavors you want to develop, you might be wondering what comes next. Well, now you wait. You should monitor the temperature of wherever you have your bottled beer stored, since temperature changes will affect fermentation. Once your beer has been fermenting for about 2 weeks, open up a bottle and do a taste test. If the carbonation is right and the flavor satisfies, you can go right ahead and pop those bottles into the fridge.
If you find the carbonation less than satisfactory, go ahead and let your brew condition for a few more days. You can check every single day, if you want.
Less Mess, More Beer
Bottling homebrewed beer fast is a talent, and so you may need a few runs before you get the rhythm. But once you do, the bottling process is going to be easier and less messy than ever before. Although you still have to wait for your beers to condition, they are already in the fridge, ready to drink when the timing is right. Now that you know how to go about bottling homebrewed beer fast, be sure to tell your brewing buddies! Or keep the secret to yourself. We won’t judge.
Recommended Reading
How and When to Harvest Hops
Whether you are a gardener or a home brewer, hops are a fantastic and easy plant to grow at home. Learn how and when harvest hops!
Best Yeast For Mead & Making Mead With Bread Yeast
You also need a great yeast strain to get things brewing up properly. Does that mean that one kind of yeast is better for making mead than others?
How and Why to do First Wort Hopping
Does trying out new brewing techniques make you nervous? Don’t worry. That happens to be the first reason you should give first wort hopping,
Brewing With Lactose: The Ultimate Guide
Lip-puckering, bitter-as-heck beers... Lactose brewing is something you may want to try if you want to develop your own home-brewed milk stout.
The Ultimate Guide to Small Batch Brewing
Whether you are trying out homebrewing for the first time or simply want to make a smaller amount of beer for an experiment, micro batch brewing is an excellent method to use.
9 Popular Types of Beer to Home Brew
You will see in our list of the most popular types of beer to home brew that even simple can be time-consuming. Start learning the basics.
