Hey there! This site is reader-supported and we earn commissions if you purchase products from retailers after clicking on a link from our site.
Beer is diverse. Wherever you go in the world, it’s guaranteed that you will see beer in a spectrum of color including pale yellows, rich reds, and even deep black. Generally, a toasty flavored beer is going to be dark, while crisper beers are lighter. Do you want to achieve the same amount of diversity in homebrewing? You can by roasting your own malt.
What is Roasted Malt?
Malt refers to germinated then kiln-dried grains that provide the fermentable sugars for beer. Malt comes in a variety of forms, though barely is the most common. You can also find oats, wheat, rice, and corn. When you roast malt, you open a new window of flavor and color exploration. In fact, the possibilities for the flavor combinations you make are endless.
About Malting
Grains aren’t malted naturally. It’s a process that transforms unmalted grains, like barely, into malted grains. In order to start the malting process, you take grains and soak them in water until they sprout, or germinate. Those germinated grains are heated then dried to discontinue the germination. During this phase of the malting process, the enzymes that trigger the germination are instead turned into starches for sugar.
That sugar becomes the fuel for the yeast in your batch of brew.
The Types of Malt for Beer
You may have several recipes already that call for a variety of malts. In order to get the many styles of beer that exist, a blend of malts is necessary. Generally, malts are broken into two groups, based on the role they play.
Base Malts
When you heat germinated grains, you produce base malts. These are not roasted. For the most part, base malts are what you use during all-grain brewing and extract brewing to create the fermentable sugars in wort. Oats, wheat, barely, and rye are all considered base malts.
Specialty Malts
If base malts are what you need to get the party started, specialty malts are the shots that keep things exciting. Specialty malts aren’t mashed to make wort. Instead, they get steeped so that their unique flavors, colors, and aromas lace the beer you’re making.
This is where roasted malts fall. Roasted malts are made by toasting dry grains in the oven to bring out a range of colors. Those colors become a part of the brew, as do their flavors. You might even be familiar with some roasted malt flavors: toffee, nuts, honey, toast, chocolate, coffee, and biscuits to name a few.
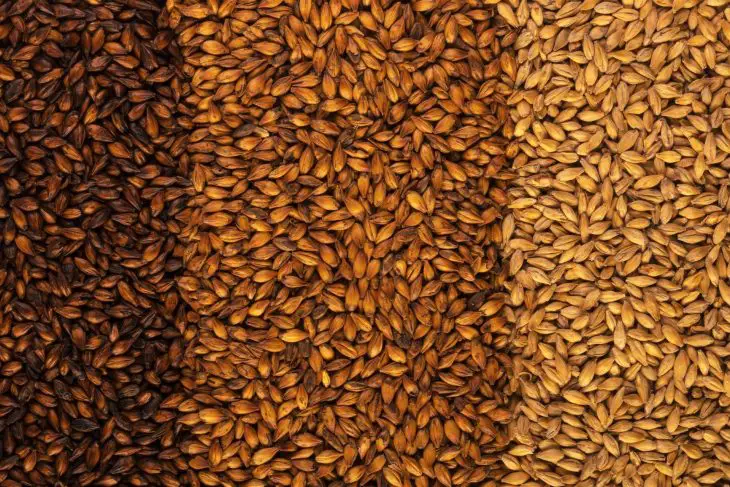
The Roasted Rainbow: How Roasting Affects Grains
Biscuit, golden, amber, chocolate, and jet black…the roasted malt rainbow is stunning and vast. Each roasted color also has its own characteristics that get added to the beer, giving you immense versatility to get creative with each color of roasted grain available.
Here is a video by Genus Brewing that talks about the flavors and uses of roasted malts, so you can get a good idea how these malts work:
So how does this roasting thing happen? Why do grains change color when toasted in the oven, and why do their flavors develop in such a way? It turns out that the rainbow of roasts you can achieve is caused by something known as the Maillard Reaction. Anything that gets browned, such as when your slice of bread becomes toast, undergoes the Maillard Reaction. Don’t confuse it with caramelization.
When something becomes browned, it is because of a chemical reaction taking place. The Maillard Reaction also produces melanoidins, a compound that makes objects darker and gives them a toasty flavor. Melanoidins are similar to the melanin in human skin, and they also make items more shelf-stable. For beer, this means that the flavor lasts longer.
How can you make the Maillard Reaction work for you? By fine-tuning the roasting process. There are a couple of factors to consider:
Roasting Temperature
Malts roast best between a temperature range of 200°F to 400°F (93°C to 204°C). The higher the temperature, the darker the roast.
Roasting Time
You will see in the chart below that the time usually ranges between 20-60 minutes, but you don’t need 20 minutes. Sometimes, you can lightly toast your grains within 15 minutes for a delicious flavor. The longer you roast your grains, the deeper and richer the malts become. Match long roast times with high temperatures, and you end up with brown or black malt.
Keep in mind that smaller grains are going to cook up a lot faster than larger grains. Dry grains roast faster than wet ones. Therefore, you might have to adjust the time based on what you’re roasting.
Dry Roasting vs Wet Roasting
Moisture content also plays a role in roasting malts. The more moisture there is, the better the Maillard Reaction.
Dry roasting is used when you want sharper, toastier, drier beer that isn’t as sweet.
Wet roasting is used for making caramel or crystal malts, as well as imbuing beer with sweet, malty goodness.
Here is a chart depicting the relationship between roasting temperature, time, and whether your grains are dry or wet:
| Temperature | Time | Dry or Wet | Grain Color | Flavors |
| 250°F (121°C) | 20 minutes | Dry | Pale Gold | Nutty and light |
| 300°F (148°C) | 25 minutes | Dry | Gold | Notes of caramel and sweet malt |
| 350°F (176.6°C) | 30 minutes | Dry | Amber | Nutty and lightly toasted |
| 350°F (176.6°C) | 60 minutes | Wet | Gold | Lightly sweet but toasted flavor |
| 350°F (176.6°C) | 90 minutes | Wet | Deep Gold/Amber | Slightly sweet but toasted and malty |
| 375°F (190.5°C) | 40 minutes | Dry | Deep Amber | Toffee and toast |
| 400°F (204°C) | 30 minutes | Dry | Copper | Strong roast flavor and nuttiness |
| 400°F (204°C) | 40 minutes | Dry | Deep Copper | Roasted with coffee notes |
| 400°F (204°C) | 50 minutes | Dry | Chocolate/Brown | Very strong roast with a bite |
| 428-446°F (220-230°C) | 1 hour in oven then kilned for 4 hours | Dry | Black | High roasted flavor that is bitter but fruity |
Should I Soak Grains Before Roasting Them?
If you’re thinking about roasting grains, you might be tempted to soak them a little bit first—as you should be. Soaking grains prior to roasting will give them a sweeter flavor and reduce the risk of burning. If you dry roast the grains, the end result is a crisp, toasted flavor.
Want to try wet-roasting your grains? All you need to do is soak them for 24 hours at room temperature. Afterwards, strain the grain of excess water then place them on the roasting tray. From there, you follow the same procedure for dry-roasted malt.
What You Need to DIY Roasting Malts
Itching to start roasting some grains? Well, there’s a few things you’re going to need. Can’t just throw the grains straight into the oven, after all.
Gather up these items first:
Barley Malt
You will want about 1 pound (0.45 kg) of uncrushed barley malt. Avoid de-husked or pearled barley, because you need the shell on the outside to get roasted. Without the shell, your grains will burn. Once you’ve roasted enough barely, feel free to branch out to other base malts, like rye, wheat, and oats. All of them can be roasted and will make homebrewing all the more enticing and fun.
Baking Pan
You will need an adequately sized baking pan for this. Make sure you have a tray with sides 1-2 inches high and with a depth of at least ½ an inch. Avoid using a pan that was used for baking something else, as lingering oils or fats could affect the grains. If you must use a pan that was previously used, line it with aluminum foil.
Oven Thermometer
As much as we would all like to trust the internal thermometer of an oven, it’s better to just assume that it’s wrong. That’s why you need a separate oven thermometer for roasting grains. This is science, so we need precision now more than ever. Having a thermometer handy means that you can keep a better eye on your roasted malts and get the color you want.
Oven or Gas Grill
Lastly, the heat source. An oven, especially one with a convection setting, is necessary for roasting grains. If you don’t have a convection setting, it’s okay. You might just have to tailor the process to your oven to ensure the roast is even across the pan.
Do you want to make a darker roast? It’s time for some grilling. This has nothing to do with flavor. When you roast at a higher temperature for a longer period of time, there’s a chance of smoke. Save yourself from dealing with a wailing smoke alarm and make your dark roast outside.
How to Roast Your Own Malt
Now you’re finally ready to roast that barely! Be sure to set aside 40-90 minutes of your day.
The following steps are for getting your roasted malt to 175 Lovibond, which is a light chocolate malt:
1. Prepare Your Grains
Grab the grains and spread them out over the roasting tray. Get a thickness of 1/2-inch deep. If you need to line the tray with foil, be sure to do that first.
2. Preheat The Grill or Oven
Take a peek at the lovely chart one more time and set the oven or grill to the desired temperature. Since we’re aiming for a light chocolate malt, it is best to set the temperature to 300°F (148°C). If you want a bit more of a toasty flavor, set it to 350°F instead.
Worried about setting your oven on fire? Keep it around 300°F, as the chance of burning your precious barley is much lower!
Once the oven or grill has preheated, take your handy oven thermometer to double check.
3. Get Roasting
If your oven is at the correct temperature, you can now add the roasting tray piled with grains. Put the tray on the middle rack, so the heat can circulate fully. For consistent color, give the tray a little shake every 10 minutes or so.
You will know the roasting has begun when a heavenly aroma fills your home. Your family or roommates might assume you’re baking bread. If you smell anything burning, be sure to give the tray a shake. Keep an eye on the grains as they roast.
4. Cool Down
For light chocolate malt, the grains will be finished in 25 minutes. Remove the tray and set it aside to cool down to room temperature. You can use your roasted barley once the grain is cool to the touch, but it’s recommended that you let the grains sit for about 2 weeks after home-roasting them. Why? Because using the roasted barley immediately will lead to harsher, more bitter beer.
If you want to let the grains mellow for 2 weeks, simply stick them in a brown paper bag somewhere cool and dry. The grains can also be stored in an airtight container for up to a year.
Advanced Malt Roasting Techniques
Are you now a roasting master? Ready to challenge yourself a little? Give these two advance techniques a try:
Black Malt
While it’s not recommended that you aim for extremely roasted malt, like black patent, which has a Lovibond rating over 500°L, you can attempt it. However, you’re going to have to do as the pros do and use a water sprayer to keep the grains from igniting in the grill.
Heat the gas grill to 450°F (232°C). Begin to roast the grains as you normally would but stir them every 5 minutes for 15 minutes. Spray the barley with water at this time. Continue roasting the grains for another 45-50 minutes, until they reach a dark brown.
You won’t be able to continue on with the kilning process that makes black patent, but this at-home method will get you close enough.
Making Crystal and Caramel Malts
You may have heard about caramel and crystal malts already. These malts are known for their sweetness and smoothness. Interestingly, these malts aren’t just roasted—they’re caramelized. Hence the reason why they’re sweeter than roasted malt.
Crystal malts are roasted at 150°F so that steam is created, letting some of the starches within the husk convert to sugar. It’s a little similar to mashing, when you think about it. Caramel malts are kilned immediately with some moisture and come out partially caramelized.
You can make both at home. Here’s how:
- Soak your choice of grains to convert the starches into sugar. To do this, you add the grains to a pot then add enough water to just cover the contents.
- Heat the water to 155°F and maintain that temperature for 1 hour.
- Strain the grains. Prepare a roasting tray that is 1/2-inch deep. Spread the grains around the tray while the oven preheats to 250°F.
- Once the oven is at 250°F, insert the tray and let the grains roast for 2 hours. They should be completely dry. If not, let them sit for a little while longer.
- Within 2 hours, you will have a Pale Gold (10°L) crystal malt. If you want a darker malt (around 40°L), turn up the oven to 350°F and let the grains continue roasting for another 15 minutes. Want a brown crystal malt? Increase that time to 45 minutes.
Color Contribution of Home-Roasted Malt
As a beer brewer and drinker, you probably know a thing or two about colors and flavors. So it’s obvious you’re going to be concerned about the color contribution of your home-roasted malt. Unfortunately, this is all about trial and error. There is no way to tell how the colors and flavors of dry-roasted malt are going to affect your recipe until you give it a try.
But there’s no point in wasting a whole batch of wort, right? That’s why there is a test you can do. Take a handful of freshly roasted grains and do a miniature mash with a mason jar or stovetop pot. Heat some water to about 150 °F then let the grain steep for 20 minutes. Strain the grains with a sieve or coffee filter.
Do the same with commercially roasted grains at the same roast level. Look at the colors of the commercially roasted varieties alongside your home-roasted grain. You might have to repeat the dry-roasting process to get the coloring correct.
Now, you might be thinking, “But I don’t have access to commercially roasted grain.” In that case, you’re going to have to brew a small batch of beer. Sure, it might not be ideal, but again, what’s homebrewing without a little experimentation and fun along the way?
The Best Kind of Roasting Around
Roasting your malt is a quick and easy addition to your homebrewing process that can add new levels of depth and character to your recipes. All you need is some basic equipment that is probably already laying about the house and some creativity to get started. Practice roasting malts whenever you can. Soon you’ll be whipping up delicious amber ales, chocolate stouts, and the darkest porters around.
FAQs About Roasted Malt
Roasted malted barley is previously malted barley that can be used as a malt for beer. When you roasted malt barley, it develops a coffee-like color and is intensely dry and bitter. The sharp flavor is often incorporated into porters and stouts. Sometimes, brewers will mix black malts or chocolate malts with roasted barley to achieve a rich color and deliciously balanced flavor.
Similar to roasted malt, toasted malt is a great way to achieve a richly nutty and toasted flavor for your beer. Toasted malt is predominately used in bocks, porters, brown ales, and Oktoberfest beers. In order to achieve toasted malt, you need to roast your grains at 350 degrees F (176 degrees C) for about 30 minutes to an hour.
Malt is a cereal grain that has been malted. When a grain undergoes malting, it is soaked in water, sprouted, and then dried with hot air to stop the growth. The grain is then air-dried before the process is repeated a few more times. Afterwards, the grains are sent to the kiln, where the malting process is completed.
The main difference between malted barley and roasted barley is that malted barley has undergone the malting process, while roasted barley could mean that the barely has not been malted. Sometimes, roasted malt is called black patent. Both malted barley and roasted barley will give a beer different flavors, so make sure you know which one belongs in your recipe!
Recommended Reading
How to Force Carbonate Your Homebrew Beer Like a Pro
Waiting for your beer to carbonate can feel like an eternity. That is why many homebrewers are making the case for investing in a keg system and learning how to force carbonate beer.
How Much Does a Beer Keg Cost?
It depends on the size and what the keg is holding. Some kegs may only be around $50, while others are going to set you back by $150-$200.
Inventing Beer Recipes – A Guide to Designing Homebrew
If you want to know about inventing beer recipes, you are in the right place. Today, you are going to get the inspiration you need, as well as a step-by-step guide to help you along the way!
How to Make a Yeast Starter For Your Homebrew
Did you know that healthy yeast is the cornerstone of a delicious beer? You can make a top-quality yeast starter easily—and we’re going to tell you how.
The Complete Guide to Growing Hops At Home
Hops are expensive, so growing hops at home is an economical choice. Besides, wouldn’t it be nice to tell others you made your beer with homegrown hops?
Bottling Homebrewed Beer Fast – An Essential How-To Guide
Here is some good news: an essential guide for bottling homebrewed beer faster than ever. Let’s get right to it.
